
- 導入ツール
- 最新版のNode.jsをインストール
- VSCodeの拡張機能をインストール & 設定ファイルの編集
- Expoからアプリを作成
- Git GitHubの設定
- TypeScriptの設定を行う
- ESLintの導入
- Prettierの導入
- stylelintの導入
- Tailwind CSSを導入する
- プロジェクトのファイル構成を整理する
- スクリーン制作(各ページのロジックを含まないもの)
- Jest の導入
- Storybookの導入
- UIライブラリの導入
- ナビゲーションの実装
- Firebaseを導入する
- React Native Debugger を導入する
- ロジック制作g
- React Nativeの各種ライブラリをダウンロードする
導入ツール
- nodenv
- yarn(npmは原則使わない)
- VSCode
- EXPO
- TypeScript
- ESLint
- Prettier
- Storybook
- React Native Debugger
- Jest
- React Navigation
- Firebase
- Native Base
- TailwindCSS(react-native-tailwind-classnames)
- Hermes
- EAS
最新版のNode.jsをインストール
Node.jsが古いままだと動かないライブラリもあるため、古いバージョンのままアプリケーション開発を始めてしまわないように注意する。
ターミナルから下記のコマンドで、インストール可能なNode.jsのリストを更新
$ anyenv updatenode.jsのバージョンのリストを取得する。
$ nodenv install -l最新のバージョン(公式の推奨版)をインストールする(14.4.0は例)
$ nodenv install 14.4.0インストールしているNodeのバージョンから、デフォルトで使うNodeバージョンを指定
$ nodenv global 14.4.0$ node --versionで現在のバージョンを確認
特定のアプリケーションだけ、デフォルトでないバージョンを使いたい場合
当該アプリケーションのディレクトリで下記のコマンドを実行。
これを実行すると、.node-version というファイルが作成され、そのディレクトリ配下で使われるNodeのバージョンがそれに固定される。
$ nodenv local <バージョン番号>VSCodeの拡張機能をインストール & 設定ファイルの編集
必須の拡張機能
- ESLint(dbaeumer.vscode-eslint)
- stylelint(stylelint.vscode-stylelint)
- Prettier(esbenp.prettier-vscode)
- Visual Studio IntelliCode(VisualStudioExptTeam.vscodeintellicode)
推奨拡張機能
あとで追加
settings.jsonの設定
Expoからアプリを作成
NodeのバージョンごとにEXPOはインストールされるため、違うNodeバージョンを使う場合は、改めてEXPOを使用するNodeバージョンにインストールする。
$ npm install -g expo-cliExpoのバージョンを確認(インストールされているかチェック)
$ expo --version任意のディレクトリに移動して、プロジェクトを作成する
$ expo init project-name下記のような選択画面になるので、blank (TypeScript)を選択する
? Choose a template: › - Use arrow-keys. Return to submit.
    ----- Managed workflow -----
    blank                 a minimal app as clean as an empty canvas
❯   blank (TypeScript)    same as blank but with TypeScript configuration
    tabs (TypeScript)     several example screens and tabs using react-navigation and TypeScript
    ----- Bare workflow -----
    minimal               bare and minimal, just the essentials to get you started
minimal (TypeScript) same as minimal but with TypeScript configuration作られたプロジェクトのディレクトリに移動しアプリを実行。
$ expo start念の為、iOS、Androidの両方のシミュレータで起動するか確認する。
$ emulator -list-avdsでAndroidシミュレータのリストを取得し、$ emulator @<起動するデバイス> -dns-server 8.8.8.8を実行してから、EXPOのRun on Androidを実行する。(そうしないとインターネット環境に接続できないため)
シミュレータが起動しない場合は、expo startをControl+Cで終了し、シミュレータからEXPOアプリを削除して、再実行する。
EXPO・シミュレータで使えるコマンド
メニューを表示
- iOS =
Command + D - Android =
Command + M
再起動
- iOS =
Command + R- もし、録画が始まってしまう場合は、「 I/O > Input > Send Keyboard Input to Device 」を有効にする。
- シミュレータの再起動時に上記が無効になることがあるのでリロードできないときは確認する
- キーボードがコマンドKででなくなったら、Toggle Keyboardなんちゃらを押す
- Android =
Rを2回
EXPOの設定
Publishで作ったEXPOアプリが簡単に外部からアクセスできてしまわないように、app.jsonに "privacy" 項目を追加
{
  "expo": { ・・・
    "version": "1.0.0",
+   "privacy": "unlisted",
    ・・・
  }
}
Git GitHubの設定
Git
expo initをした際、最初のGitコミットはすでに実行されている。
git log等のコマンドで確認できる。
GitHub
Githubのサイトで新しいレポジトリを作成する
URL(git@~)をコピーし、下のコマンドを実行
$ git remote add origin <コピーしたURL>$ git remote
// origin になればOK
$ git branch
// master になればOK(mainになっていたら、下のコードのmasterをmainに変更)GitHubのレポジトリにプッシュする
$ git push -u origin masterGitのコマンド一覧
// 後で書く
$ git
TypeScriptの設定を行う
ts.config.jsonに以下の内容を記述する
{・・・
  "jsx": "・・・",
+ "baseUrl": "src",
+ "downlevelIteration": true
}| "noImplicitAny": true | これが指定されていないと、引数の型定義がなくても暗黙のうちにany型があてがわれてコンパイルが通ってしまう。 |
| "strictNullChecks": true | これが指定されていないと、例えばstring型で定義した変数に null や undefined を代入できてしまう。(null安全性が保証されず実行時エラーが頻発しかねない) |
ESLintの導入
設定ファイルを作成
ESLintの最新バージョンを確認
$ npm show eslint最新バージョンをダウンロード
$ yarn add -D eslint@<最新バージョンの番号>ESLintの設定ファイルを作成する
$ yarn eslint --init? How would you like to use ESLint?
》To check syntax, find problems, and enforce code style
? What type of modules does your project use? JavaScript modules (import/export) 》JavaScript modules (import/export)
? Which framework does your project use? 》React
? Does your project use TypeScript? 》Yes
? Where does your code run? 》Node
? How would you like to define a style for your project? 》Use a popular style guide
? Which style guide do you want to follow? 》Airbnb: https://github.com/airbnb/javascript
? What format do you want your config file to be in? 》JavaScript
The config that you've selected requires the following dependencies:
eslint-plugin-react@^VERSION @typescript-eslint/eslint-plugin@latest eslint-config-airbnb@latest eslint@^VERSION eslint-plugin-import@^VERSION eslint-plugin-jsx-a11y@^VERSION eslint-plugin-react-hooks@^VERSION @typescript-eslint/parser@latest
? Would you like to install them now with npm? 》No最後の? Would you like to install them now with npm? 》Noにするのは、YesにするとYarnじゃなくてnpmでインストールされるから。(パッケージ管理はYarnに統一したいので、あとで改めて上記のeslint-系をインストールする。)
上記のコマンドで、error Command failed with exit code 2.というエラーが出るが、.eslintrc.jsが作成されているはずなので確認する。
設定ファイルはJavascriptにしておくのがぶなんらしいのでそうする。
下記で未インストール(上記)のプラグインをインストールする
$ yarn add -D <例:yarn add -D eslint-plugin-react@7.21.5 eslint-config-airbnb@latest eslint@7.2.0 eslint-plugin-import@2.22.1 eslint-plugin-jsx-a11y@6.4.1 eslint-plugin-react-hooks@4 >例えばこんな感じ↓のがでてくるので
eslint-plugin-react@^7.21.5 @typescript-eslint/eslint-plugin@latest eslint-config-airbnb@latest eslint@^5.16.0 || ^6.8.0 || ^7.2.0 eslint-plugin-import@^2.22.1 eslint-plugin-jsx-a11y@^6.4.1 eslint-plugin-react-hooks@^4 || ^3 || ^2.3.0 || ^1.7.0 @typescript-eslint/parser@latest最終的にこんな感じにインストール
$ yarn add -D eslint-plugin-react @typescript-eslint/eslint-plugin eslint-config-airbnb eslint-plugin-import eslint-plugin-jsx-a11y eslint-plugin-react eslint-plugin-react-hooks @typescript-eslint/parser$ typesync
$ yarn設定ファイルにインストールしたプラグイン等の設定を書き加える
プラグインは読み込んだだけではなんのルールも適用されないので、プラグイン開発者がパッケージ内で推奨の「共有設定」を一緒に提供しており、それを適用する。
.eslintrc.jsのextendsに下記のように記入する。
  extends: [
    'plugin:react/recommended',
    'airbnb',
    'airbnb/hooks',
    'plugin:import/errors',
    'plugin:import/warnings',
    'plugin:import/typescript',
    'plugin:@typescript-eslint/recommended',
    'plugin:@typescript-eslint/recommended-requiring-type-checking',
  ],
※下の方の設定が優先されるので、各順番には注意する。(プラグインのnpmページを見て確認する癖をつけておく)
paserOptionsに下記を設定。
  parser: '@typescript-eslint/parser',
  parserOptions: {
    ecmaFeatures: {
      jsx: true,
    },
    ecmaVersion: 12,
+   project: './tsconfig.eslint.json',
    sourceType: 'module',
+   tsconfigRootDir: __dirname,
  },
project: './tsconfig.eslint.json'でプロジェクトのTypeScriptコンパイル設定ファイルのパスを指定。
tsconfig.eslint.jsonというファイルをアプリディレクトリ直下に新規に作成し下記をコピペ
(こうしないとパーサが npm パッケージのファイルまでパースしてしまって、VS Code と連携させ たときのパフォーマンスがガタ落ちしたり、新規ファイルのパースに失敗したりしてしまう)
{
  "extends": "./tsconfig.json",
  "include": [
    "App.tsx",
    "src/**/*.js",
    "src/**/*.jsx",
    "src/**/*.ts",
    "src/**/*.tsx"
  ],
  "exclude": [
    "node_modules"
  ]
}.eslintrc.jsのpluginsに下記のように記入する。(読み込ませる追加ルールのプラグインを適用)
  plugins: [
    '@typescript-eslint',
+   'import',
+   'jsx-a11y',
    'react',
+   'react-hooks',
  ],
+ root: true,rootオプションは、ESLintはデフォルトの挙動として親ディレクトリの設定ファイルまで読み込んでしまうので、それを抑止するためのもの。
.eslintrc.jsのrulesに下記のように記入する。
  rules: {
    // occur error in `import React from 'react'` with react-scripts 4.0.1
    'no-use-before-define': 0,
    '@typescript-eslint/no-use-before-define': 0,
    'lines-between-class-members': [
      'error',
      'always',
      {
        exceptAfterSingleLine: true,
      },
    ],
    'no-void': [
      'error',
      {
        allowAsStatement: true,
      },
    ],
    'padding-line-between-statements': [
      'error',
      {
        blankLine: 'always',
        prev: '*',
        next: 'return',
      },
    ],
    '@typescript-eslint/no-unused-vars': [
      'error',
      {
        'vars': 'all',
        'args': 'after-used',
        'argsIgnorePattern': '_',
        'ignoreRestSiblings': false,
        'varsIgnorePattern': '_',
      },
    ],
    'import/extensions': [
      'error',
      'ignorePackages',
      {
        js: 'never',
        jsx: 'never',
        ts: 'never',
        tsx: 'never',
      },
    ],
    'react/jsx-filename-extension': [
      'error',
      {
        extensions: ['.jsx', '.tsx'],
      },
    ],
    'react/jsx-props-no-spreading': [
      'error',
      {
        html: 'enforce',
        custom: 'enforce',
        explicitSpread: 'ignore',
      },
    ],
    'react/react-in-jsx-scope': 'off',
  },
  overrides: [
    {
      'files': ['*.tsx'],
      'rules': {
        'react/prop-types': 'off',
      },
    },
  ],
  settings: {
    'import/resolver': {
      node: {
        paths: ['src'],
      },
    },
  },
'no-use-before-define' '@typescript-eslint/no-use-before-define'
→ 現状こうしないとimport React from 'react'のインポート文でエラーになる?(要確認)
'lines-between-class-members'
→ クラスメンバーの定義の間に空行をいれるかどうかを定義するルール。ここでは1行記述のメンバーのときは空行を入れなくていいようにしている。
no-void
→ void演算子の(式としての)使用を禁ずるルール。Effect Hook内では、void文を使うことがあるため文のみOK
以下、りあクト!p60参照(余裕あったらここに記述する)
※'no-use-before-define': 0, '@typescript-eslint/no-use-before-define': 0は、reactnativeでスタイルシートの定義をあとの行で書きたかったので変更
.eslintignoreファイルを作ってESLintのチェックの対象外となるファイルを定義する
.expo/
.expo-shared/
assets/
**/coverage/
**/node_modules/
**/*.min.js
*.config.js
.*lintrc.js
VSCodeのsettings.jsonに次の内容を記述
これでVSCodeのコーディング中にもESLintが走るようになる
{ ...(省略)
  // セーブ時にESLintの自動整形を走らせる
  "editor.codeActionsOnSave": {
      "source.fixAll.eslint": true,
  },
  "editor.formatOnSave": false,
  "eslint.packageManager": "yarn",
  // チェック基準をプロジェクトのTSバージョンかVSCodeのTSバージョンか選ばせる
  "typescript.enablePromptUseWorkspaceTsdk": true
... }
"typescript.enablePromptUseWorkspaceTsdk"を設定するのはVSCodeのTSのバージョンが最新版より古いことがほとんどのため。
この設定を行うとTypeScript のファイルを開いてるときは下のステータスバーに実行中の TypeScript のバージョ ンが表示されているので、それをクリックすれば選択オプションを開くことができる
VSCodeに尋ねさせないで強制的にプロジェクト側のTSを使わせたい場合は下記
"typescript.tsdk": "./node_modules/typescript/lib",App.tsxを開いて適宜直していく(りあクトp64)
ESLintに黙っていてほしいとき
/* eslint-disable react/jsx-one-expression-per-line */
... eslint-disable はそのコメント以降からファイルが終わるまで、ESLint のチェックを無効化する コメント。続けて該当ルール名を記述するとそのルールだけが無効化され、ルール名がなければすべてのルールが無効化される。無効化を中断したければeslint-enableコマンドを書けばそこ以降はlint走る
// eslint-disable-next-line @typescript-eslint/explicit-module-boundary-types
... 1 行だけ無効化するのにわざわざ開始と終了を書くのが面倒な場合は、同じ行にコメントとして // eslint-disable-line を追加するか、直前の行に // eslint-disable-next-line を書けば同じことに なる
ただし、ルールの無効化は乱用しすぎないように注意
package.jsonにLintのScriptを記述
  "scripts": {
    "start": "expo start",
    "android": "expo start --android",
    "ios": "expo start --ios",
    "web": "expo start --web",
    "eject": "expo eject"
+   "lint": "eslint 'src/**/*.{js,jsx,ts,tsx}'",
+   "lint:fix": "eslint --fix 'src/**/*.{js,jsx,ts,tsx}'",
+   "preinstall": "typesync || :"
  },
Prettierの導入
Prettierは、インデントや改行などの記述スタイルのフォーマットを統一して整形してくれるツール。
ESLintの環境にPrettierを加えるには以下の2つのパッケージが必要
- prettier ・・・ Prettier本体
- eslint-config-prettier ・・・ Prettierと競合する可能性のあるESLintの各種ルールを無効にする共有設定
導入にはまず下記のコマンドを実行
$ yarn add -D prettier eslint-config-prettier
$ (typesync)
$ yarn次に、.eslintrc.jsを次のように書き換える
  extends: [
    'plugin:react/recommended',
    'airbnb',
    'airbnb/hooks',
    'plugin:import/errors',
    'plugin:import/warnings',
    'plugin:import/typescript',
    'plugin:@typescript-eslint/recommended',
    'plugin:@typescript-eslint/recommended-requiring-type-checking',
+   'prettier',
  ],
※'prettier'を書く行は絶対にextendsの一番最後。
次に、.prettierrcというファイルを次の内容でプロジェクトルートに作成する
{
  "singleQuote": true,
  "trailingComma": "all"
}
※前回EXPOで作ったときは、{}で囲まないとエラーが出た。
詳しいドキュメントは以下(基本は上2つで大丈夫)

次に、ESLintで設定してあったルールとPrettierで設定したルールが衝突していないかプロジェクトルートから下記のコマンドを実行して確かめる
 $ npx eslint-config-prettier 'src/**/*.{js,jsx,ts,tsx}'

 No rules that are unnecessary or conflict with Prettier were found.
例えば以下のようなエラーが出た場合、@typescript-eslint/indentを削除してみるなどしてエラーを消す
The following rules are unnecessary or might conflict with Prettier:
- @typescript-eslint/indent
- @typescript-eslint/no-extra-semi
- react/jsx-closing-bracket-location
- react/jsx-tag-spacing次にPrettierをnpmのscriptsコマンドで実装できるように、package.jsonに登録
  "scripts": {
    ・・・
+   "fix": "npm run -s format && npm run -s lint:fix",
+   "format": "prettier --write --loglevel=warn 'src/**/*.{js,jsx,ts,tsx,gql,graphql,json}'",
    "lint": "eslint 'src/**/*.{js,jsx,ts,tsx}'",
    "lint:fix": "eslint --fix 'src/**/*.{js,jsx,ts,tsx}'",
+   "lint:conflict": "eslint-config-prettier 'src/**/*.{js,jsx,ts,tsx}'",
    "preinstall": "typesync || :"
  },
最後にVSCの設定を行う(Prettier公式の拡張がまだの場合はインストールしておく)
{ ・・・
  "editor.defaultFormatter": "esbenp.prettier-vscode",
  "[graphql]": {
    "editor.formatOnSave": true
  },
  "[javascript]": {
    "editor.formatOnSave": true
  },
  "[javascriptreact]": {
    "editor.formatOnSave": true
  },
  "[json]": {
    "editor.formatOnSave": true
  },
  "[typescript]": {
    "editor.formatOnSave": true
  },
  "[typescriptreact]": {
    "editor.formatOnSave": true
  },
・・・ }
これで各種ファイルの保存時に自動整形が走るようになる。
stylelintの導入
※ ことRNにおいてはstylelintいらないのでは??(ちゃんと調べろ)
CSSにもいろいろなコーディングスタイルが乱立しており複雑なのでlinterを導入する
まずは、次のパッケージをインストールする
- stylelint ・・・ stylelint本体
- stylelint-config-standard ・・・ stylelint公式による標準の共有設定
- stylelint-order ・・・ stylelintの並び順に関するルールセットのプラグイン
- stylelint-config-recess-order ・・・ RECESSにもとづくCSSの並べ替えのための共有設定
$ yarn add -D stylelint stylelint-config-standard stylelint-order stylelint-config-recess-order
$ (typesync)
$ yarn
次に、プロジェクトルートに .stylelintrc.jsというファイルを下記の内容で作成
module.exports = {
  extends: [
    'stylelint-config-standard',
    'stylelint-config-recess-order',
  ],
  plugins: [
    'stylelint-order',
  ],
  ignoreFiles: [
    '**/node_modules/**',
  ],
  rules: {
    'string-quotes': 'single',
  },
};
※Unknown word (CssSyntaxError)が出たら、一旦プロジェクトを閉じてもう一度開くと直るかも。
次に、VSCodeのsettings.jsonに下記のルールを記述
{
+ "css.validate": false,
+ "less.validate": false,
+ "scss.validate": false,
  "editor.codeActionsOnSave": {
    "source.fixAll.eslint": true,
+   "source.fixAll.stylelint": true
  },
  "editor.formatOnSave": false,
・・・
}次に、package.jsonのScriptに登録する(ESLintやPrettierと同時に走るようにする)
lint:style系のファイル作らんのならこれ全部修正する
  "scripts": {
    "start": "react-scripts start",
    "build": "react-scripts build",
    "test": "react-scripts test",
    "eject": "react-scripts eject",
    "fix": "npm run -s format && npm run -s lint:fix",
    "format": "prettier --write --loglevel=warn 'src/**/*.{js,jsx,ts,tsx,gql,graphql,json}'",
-   "lint": "eslint 'src/**/*.{js,jsx,ts,tsx}'",
-   "lint:fix": "eslint --fix 'src/**/*.{js,jsx,ts,tsx}'",
+   "lint": "npm run -s lint:style; npm run -s lint:es",
+   "lint:fix": "npm run -s lint:style:fix && npm run -s lint:es:fix",
+   "lint:es": "eslint 'src/**/*.{js,jsx,ts,tsx}'",
+   "lint:es:fix": "eslint --fix 'src/**/*.{js,jsx,ts,tsx}'",
    "lint:conflict": "eslint-config-prettier 'src/**/*.{js,jsx,ts,tsx}'",
+   "lint:style": "stylelint 'src/**/*.{css,less,sass,scss}'",
+   "lint:style:fix": "stylelint --fix 'src/**/*.{css,less,sass,scss}'",
    "preinstall": "typesync || :"
  },
追加設定
ESLintにもたくさんのサードパーティ製ライブラリが存在しており、各自自由に導入している。
Awesome ESLint というリポジトリにはそういったプラグインや共有設定が100個以上掲載されている。
この中で、関数定義をアロー関数に統一する eslint-plugin-prefer-arrowは追加しておきたい。
$ yarn -D add eslint-plugin-prefer-arrow.eslintrc.jsに下記を記述
module.exports = {
  ・・・
  plugins: [
    '@typescript-eslint',
    'import',
    'jsx-a11y',
+   'prefer-arrow',
    'react',
    'react-hooks',
  ],
  ・・・
  rules: {
    ・・・
+   'prefer-arrow/prefer-arrow-functions': [
      'error',
      {
        disallowPrototype: true,
        singleReturnOnly: false,
        classPropertiesAllowed: false,
      },
    ],
    ・・・
  },
・・・
};
設定はできるだけシンプルに
eslintrc.jsの設定は随時見直しをかける必要がある。
(linter本体やプラグインが下方互換性のない変更を結構いれるせいでバージョン上げたらエラーが出まくるなどあるため)
メンテナンスが大変にならないように、設定はこれまで書いたような最小限のものだけにしておき、どうしても必要だと思った設定だけ継ぎ足していくようにしてシンプルさを保つようにする。
最後に
ここでいったん全部のlinterとフォーマットを走らせてみる
$ yarn fix上記コマンドでは、簡単なルール違反は自動で修正してくれるが、直しきれないものは下記のようにエラーとして出力される。(この例ではreportWebVitals.tsを手で修正して直す)
/PROJECT_DIR/Riakuto-StartingReact-ja3.1/06-lint/04-advanced-new/src/reportWebVitals.ts
    3:25 warning Missingreturntypeonfunction
        @typescript-eslint/explicit-module-boundary-types
    5:5 error Promises must be handled appropriately or explicitly marked as ignored with the
    `void` operator
        @typescript-eslint/no-floating-promises

✖ 2 problems (1 error, 1 warning)

error Command failed with exit code 1.

info Visit https://yarnpkg.com/en/docs/cli/run for documentation about this command.
加えて、Gitリポジトリへコミットしたときにすべてのlintチェックが走るようにしておく。(うっかりlintのかかってないコードをコミットしてしまわないため)
Git Hooksというしくみを使う。(huskyは最近変な変更があったので不人気)
$ yarn add -D simple-git-hooks lint-staged次に package.jsonに下記を記述
{ ・・・
  "scripts": {
    ・・・
    "lint:style:fix": "stylelint --fix 'src/**/*.{css,less,sass,scss}'",
    "preinstall": "typesync || :",
+   "prepare": "simple-git-hooks > /dev/null"
  },
  ・・・
  "devDependencies": {
    ・・・
  },
+ 下記を追加 +
 "simple-git-hooks": {
    "pre-commit": "npx lint-staged"
  },
  "lint-staged": {
    "src/**/*.{js,jsx,ts,tsx}": [
      "prettier --write --loglevel=error",
      "eslint --fix --quiet"
    ],
    "src/**/*.{css,less,sass,scss}": [
      "stylelint --fix --quiet"
    ],
    "{public,src}/**/*.{html,gql,graphql,json}": [
      "prettier --write --loglevel=error"
    ]
  }
+ 以上 +
}
次に、下記のコマンドを実行
$ npx simple-git-hooks

[INFO] Successfully set the pre-commit with command: npx lint-staged
[INFO] Successfully set all git hooks
これで、package.jsonに記述した設定が登録される。
登録されたGitHooksを削除したいときは、package.jsonの該当設定を削除してnpx simple-git-hooksを実行。
Monorepoの際の注意点
「Monorepo」とは、一つのプロジェクトの中に複数のプロジェクトをおいているケース。
普通の開発の現場ではフロントエンドとバックエンド、定期実行スクリプト群なんかをひとつのリポジトリで管理することが多い。
この場合だと、プロジェクトルートの親ルート(リポジトリルート)からGitHooksが実行されてしまい、エラーになるので、
「Monorepo」とは、一つのプロジェクトの中に複数のプロジェクトをおいているケース。
普通の開発の現場ではフロントエンドとバックエンド、定期実行スクリプト群なんかをひとつのリポジトリで管理することが多い。
この場合だと、プロジェクトルートの親ルート(リポジトリルート)からGitHooksが実行されてしまい、エラーになるので
「Monorepo」とは、一つのプロジェクトの中に複数のプロジェクトをおいているケース。
普通の開発の現場ではフロントエンドとバックエンド、定期実行スクリプト群なんかをひとつのリポジトリで管理することが多い。
この場合だと、プロジェクトルートの親ルート(リポジトリルート)からGitHooksが実行されてしまい、エラーになるので、
リポジトリの中で JSX とかの任意の種類のファイルに変更があったプロジェクトを抽出して、そのディレクトリでコマンドを実行してくれるシェルスクリプトを自分で書く
package.jsonのsimple-git-hooksの箇所を以下のように変更
(追加で、任意のプロジェクトのテストをプッシュ前に全実行しておく test-around も入れてある)
 "simple-git-hooks": {
    "pre-commit": ". ./lint-staged-around",
    "pre-push": ". ./test-around"
  },
Tailwind CSSを導入する
tailwind-react-native-classnames(現在は2版のtwrncが最新なのでそっちに変更)をインストールする
$ yarn add twrnc tailwindcss@^2.0※ tailwind-rnを yarn addしたらシミュレータがリフレッシュしまくって落ちることが頻発していたのを、yarn remove して expo install tailwind-rn すると直ったので、twrnc でも同様のことが起こったらexpo install試してみるといいかも。
次に下記のコマンドを実行し、tailwind.config.jsonを作成する(コード補完・拡張のために必要)
$ npx tailwindcss initVSCodeの拡張機能「Tailwind CSS IntelliSense」をインストールする。
コード補完を行えるように、VSCodeのsettings.jsonに以下の設定を追加する
{・・・
  "tailwindCSS.experimental.classRegex": [
    "tw`([^`]*)",
    ["tw.style\\(([^)]*)\\)", "'([^']*)'"]
  ],
  "tailwindCSS.includeLanguages": {
    "javascript": "javascript",
    "plaintext": "html",
    "typescript": "javascript",
    "typescriptreact": "javascript"
  }
・・・}これでコード補完が行えるはず、ただし、出てくるのはreact-native用のCSSではなく、普通のTailwindCSSの補完なので注意されたし。(RNで使えるCSSはだいたいカバーしているはず)
まず、プロジェクトルートの src 配下に、libフォルダを作る
libフォルダに tailwind.jsファイルを作成し、下記を入力(パスはプロジェクトによって変更ある)
import { create } from 'twrnc';

// create the customized version...
// eslint-disable-next-line
const tw = create(require(`../../tailwind.config.js`));

// ... and then this becomes the main function your app uses
export default tw;
今後は、こっちの tw を使いたいので、twを使っていたファイルの参照先を変更する
import tw from './lib/tailwind';ブレークポイントのカスタマイズは、tailwind.config.jsを使って、tailwindcssのウェブプロジェクトと同じ方法で行うことができます。tailwindcssに同梱されているデフォルトは、ウェブ向けに設定されていますので、興味のあるデバイスサイズに合わせて、以下のように自分で設定したいと思います。
// tailwind.config.js
module.exports = {
  theme: {
    screens: {
      sm: '380px',
      md: '420px',
      lg: '680px',
      // or maybe name them after devices for `tablet:flex-row`
      tablet: '1024px',
    },
  },
};
カスタムユーティリティを追加するには、.cssファイルに書き込むのではなく、tailwindのドキュメントに記載されているプラグインメソッドを使用します。Twrncはplugin()関数を提供していますが、純正のtailwindcss関数とも互換性があります。
// tailwind.config.js
const { plugin } = require('twrnc');

// or, you can use tailwinds plugin function:
const plugin = require('tailwindcss/plugin');

module.exports = {
  plugins: [
    plugin(({ addUtilities }) => {
      addUtilities({
        btn: {
          padding: 3,
          borderRadius: 10,
          textTranform: `uppercase`,
          backgroundColor: `#333`,
        },
        'resize-repeat': {
          resizeMode: `repeat`,
        },
      });
    }),
  ],
};
また、CSS-in-JSのスタイルオブジェクトを使用する代わりに、他のユーティリティクラスの文字列(@applyに似ています)を供給することができます。
module.exports = {
  plugins: [
    plugin(() => ({ addUtilities }) {
      addUtilities({
        // 😎 similar to `@apply`
        btn: `px-4 py-1 rounded-full bg-red-800 text-white`,
        'body-text': `font-serif leading-relaxed tracking-wide text-gray-800`,
      });
    }),
  ],
};
twrncでは、tw.matchPrefix(…prefix: string[]) => boolean関数も公開しており、現在のデバイスのコンテキストで、与えられたプレフィックス(またはプレフィックスの組み合わせ)がスタイルを生成するかどうかをテストすることができます。これは、プリミティブな値をコンポーネントに渡す必要がある場合や、現在のデバイスに関するtwの知識を活用したい場合、あるいはデバイスコンテキストに基づいて何らかのロジックを実行したい場合などに便利です。これはPlatformをインポートしたり、他のRNフックを組み合わせたりすることでも実現できますが、すでにtwの関数をインポートしている場合が多いと思いますので、この機能を使えば、自分ですべてのロジックを再実装する必要はありません。
const SomeComponent = () => (
  <View>
    <Thumbnail imageSize={tw.matchPrefix(`portrait`) ? 60 : 90} />;
    {tw.matchPrefix(`ios`, `dark`) ? <CustomIosDarkModeThing /> : <Thing />}
  </View>
);
CSSのボックスシャドウはRNのシャドウとは大きく異なるため、本ライブラリはCSSのボックスシャドウの文字列を解析してRNのスタイルオブジェクトに変換しようとはしません。その代わりに、tailwindcssには存在しない、RNの4つのシャドウプロップに対応する多くの低レベルのユーティリティを提供します。
// RN `shadowColor`
tw`shadow-white`; // > { shadowColor: `#fff` }
tw`shadow-red-200`; // > { shadowColor: `#fff` }
tw`shadow-[#eaeaea]`; // > { shadowColor: `#eaeaea` }
tw`shadow-black shadow-color-opacity-50`; // > { shadowColor: `rgba(0,0,0,0.5)` }

// RN `shadowOffset`
tw`shadow-offset-1`; // > { shadowOffset: { width: 4, height: 4 } }
tw`shadow-offset-2/3`; // > { shadowOffset: { width: 8, height: 12 } }
tw`shadow-offset-[3px]`; // > { shadowOffset: { width: 3, height: 3 } }],
tw`shadow-offset-[4px]/[5px]`; // > { shadowOffset: { width: 4, height: 5 } }],

// RN `shadowOpacity`
tw`shadow-opacity-50`; // { shadowOpacity: 0.5 }

// RN `shadowRadius`
tw`shadow-radius-1`; // { shadowRadius: 4 }
tw`shadow-radius-[10px]`; // { shadowRadius: 10 }
また、tailwindcssで提供されているshadow-ユーティリティーのデフォルトの実装も提供していますので、使用することができます。
tw`shadow-md`;
/*
-> {
  shadowOffset: { width: 1, height: 1 },
  shadowColor: `#000`,
  shadowRadius: 3,
  shadowOpacity: 0.125,
  elevation: 3,
}
*/
これらの名前付きシャドウ・クラスのデフォルト実装を上書きするには、独自のカスタム・ユーティリティを追加してください -- あなたが同じ名前で提供するカスタム・ユーティリティは、このライブラリに同梱されているものを上書きします。
twrncは、サポートされているRN(Webではなくネイティブ)スタイルのプロップと重なるtailwindのユーティリティをすべて実装しています。また、Web-CSSに対応していないRN限定のユーティリティも追加されています。
- low-level shadow utilities(上記で説明)
- elevation (android only), eg:
elevation-1,elevation-4 small-caps->{fontVariant: 'small-caps'}(小文字がちょっと大きい大文字になる)- number based font-weight utilities
font-100,font-400, (100...900)→font-normalとかじゃなくてこんな書き方でもできるよという意味 direction-(inherit|ltr|rtl)→アラビア語とか文字方向変えるときにalign-self: baseline;viaself-baselineinclude-font-paddingandremove-font-padding(android only:includeFontPadding)
JIT-スタイルの任意の値でTailwind書ける-に対応
Tailwind JITで可能になった任意のスタイルのユーティリティーの多くは、Twrncで実装されています。
- arbitrary colors:
bg-[#f0f],text-[rgb(33,45,55)] - negative values:
-mt-4,-tracking-[2px] - shorthand color opacity:
text-red-200/75(red-200at75%opacity) - merging color/opacity:
border-black border-opacity-75 - arbitrary opacity amounts:
opacity-73 - custom spacing:
mt-[4px],-pb-[3px],tracking-[2px] - arbitrary fractional insets:
bottom-7/9,left-5/8 - arbitrary min/max width/height:
min-w-[40%],max-h-3/8,w-[25vw],h-[21px] - arbitrary breakpoints:
min-w-[600px]:flex-row,max-h-[1200px]:p-4
現在、すべてのユーティリティーがすべてのバリエーションの任意値をサポートしているわけではありませんので、不足していると思われるものを見つけた場合は、issueまたはPRを作成してください。
Storybookをインストールしたときに出た。
以下を実行
$ yarn remove tailwindcss
$ yarn add tailwindcss@npm:@tailwindcss/postcss7-compat @tailwindcss/postcss7-compat
プロジェクトのファイル構成を整理する
スクリーン制作(各ページのロジックを含まないもの)
Jest の導入
公式:

Expo で利用する際のドキュメント
Testing with Jest - Expo Documentation
参考:

zennの記事は、jestのインストール法や、"transformIgnorePatterns": の値が最新の公式のと違っており、test失敗するので、基本は、Expoのドキュメントを見て、tsに関する部分だけ参照するようにする。(react-test-rendererの代わりに react-native-testing-library使う)
@testing-library/react-native でスナップショットテスト | Honmushi blog

便利なのでjest-nativeもいれとく。
testファイルをどこに置くか
テストしたいファイルの置き方は以下の2種類
- __tests__ フォルダにテストを格納する(よくあるのは
ルートディレクトリ>__test__>テストファイル) - テストのファイル名に
.spec.jsまたは.test.js拡張子をつける
上記のどちらでもいいが、ファイルを1箇所にまとめたほうが見通しがよさそうなので、ルートディレクトリ直下の__test__フォルダにすべてのテストファイルをまとめる
ルートディレクトリ
    > __test__
         > components
               > Button.test.tsx
    > src
          > components
                > Button.tsx
    > App.tsx
    ...
NativeBase対応
Providerを使うライブラリとかだと、以下のエラーがでる。
 useTheme: `theme` is undefined.
Seems you forgot to wrap your app in
`<NativeBaseProvider />`
@testing-library/react-native でスナップショットテスト | Honmushi blog 参照に作る(.tsとか.jsxだと動かなくなるのでutil.jsで作る)
加えて、NativeBaseだと以下を参照する

以下のような感じになる。
// __test__/test-util.js
import { render } from "@testing-library/react-native";
import { NativeBaseProvider } from "native-base";
import React from "react";

const AllTheProviders = ({ children }) => {
  const inset = {
    frame: { x: 0, y: 0, width: 0, height: 0 },
    insets: { top: 0, left: 0, right: 0, bottom: 0 },
  };

  return <NativeBaseProvider initialWindowMetrics={inset}>{children}</NativeBaseProvider>;
};

const customRender = (ui, options) =>
  render(ui, { wrapper: AllTheProviders, ...options });

// re-export everything
export * from "@testing-library/react-native";

// override render method
export { customRender as render };
スナップショットファイルの出力先を1箇所にまとめる
デフォルトでは、.toMatchSnapshot() したファイルがあるディレクトリ直下に__snapshots__/生成されたスナップショットファイル となるが、こうなると、__snapshots__がいろんなところに生成されて、見づらい気がするので、__test__直下の__snapshots__ディレクトリ下に1箇所にスナップショットをまとめるようにする。
参考:

Tips
error Command failed with exit code 1.
yarn test で、上記のエラーが出る原因は、Snapshots: 1 file obsolete, 1 passed, 1 total 。
昔作ったスナップショットが悪さしており、特にテストに影響ないが解決したかったら、
yarn test -uでスナップショットを上書きしてやるといい。(スナップショット作成するディレクトリ変えてるのが影響していたりするんだろうか。)
Storybookの導入
公式:
Storybook for React Native tutorial | Storybook Tutorials
参考:

React Native(Expo)でStorybook v6をつかってみた | BLOG | 株式会社スタジオ・アルカナ (s-arcana.co.jp)

導入手順
これの通りやればいい。
サーバで立ち上げについて
→ 立ち上げる際には、onDeviceUI(シミュレータ上で表示する動画のやり方)も立ち上げないと、左バーがスケルトンのまま表示されない。
用途だが、サーバから複数デバイスを同時に操りたいようなときに使う(以下の動画を参考)
/
expo init アプリ名でアプリを作成(typescript)
作成したプロジェクトに移動し、以下を実行
npx -p @storybook/cli sb init --type react_nativeDo you want to install dependencies necessary to run Storybook server? You can manually do it later by install @storybook/react-native-server › (y/N) • Adding Storybook support to your "React Native" app
と出る。
上記の動画のようにサーバーからすべてのデバイスを操ったりした使い方をしたければ、y。
ちなみに、あとからyarn add -D @storybook/react-native-serverでダウンロードできるので、どちらでもいい。サーバをダウンロードしたら、package.jsonのscriptsに以下を記述
"storybook": "start-storybook -p 7007"
実行が終了すると、プロジェクトに以下のディレクトリが追加される。
ルートプロジェクト
  |_ storybook
  |    |_ stories
  |    |    |_ Button
  |    |    |    |_ Button.stories.js (storyを登録←他のstories使うにはここを参照)
  |    |    |    |_ index.js (presentional コンポーネント)
  |    |    |_ index.js (作った~.stories.jsを読み込んで使えるようにする)
  |    |_ addons.js (Storyサーバで使うaddonを登録するやつ?)
  |    |_ index.js (アプリのエントリーポイントなどの各種設定)
  |    |_ rn-addons.js (onDeviceUIで使うaddonを登録するやつ)
onDeviceUI(シミュレータでストーリーを確認できる)を使うには、App.tsxファイルのexport をいかに変更
export {default} from './storybook';
// export default function App() {...}
Storybookを使う際は、上記のようにもとのエクスポート文をコメントアウトして使うといい。
また、storybook/index.jsに以下を記述
const StorybookUIRoot = getStorybookUI({
  asyncStorage: null
});また、.eslintrc.jsの ruleに以下を記述
{
...
rules: {
...
  'import/no-extraneous-dependencies': [
      'error',
      {
        devDependencies: [
          'storybook/**',
          'stories/**',
          '**/*/*.story.*',
          '**/*/*.stories.*',
        ],
      },
    ],
  }
}.eslintignoreに以下を記述
storybook/stories/index.jsStorybookを使う際には、以下のディレクトリ構成でやってみる
storybook/stories
    |_ index.js (下で作成したstories.tsxを登録)
src/components
(案1)
    |_ Button
            |_ Button.tsx(またはindex.tsx)
            |_ Button.stories.tsx
(案2)
    |_ Button.tsx
    |_ Button.stories.tsx
    |_ Component2.tsx
    |_ Component2.stories.tsx
UIライブラリの導入
NativeBaseの導入手順

VSCodeに拡張機能「NativeBase VS Code Extensions」を導入するとコード補完が効く(nb-box等)
ナビゲーションの実装
React Navigation の導入
公式ドキュメントを参考に導入する

V5とV6の変更点
Firebaseを導入する
Firebaseのサイトでアプリを作成。firestoreと認証の設定を済ませる
yarn add firebasefirebaseのAPIキーを環境変数に格納するためのライブラリ「dotenv」と「expo-constants」を導入する
expo install dotenv expo-constantsプロジェクトルートに .envファイルを作成し、以下を記述(***)はそれぞれ対応するキー名を入れる
// .env

API_KEY=***
AUTH_DOMAIN=***
PROJECT_ID=***
STORAGE_BUCKET=***
MESSAGING_SENDER_ID=***
APP_ID=***
Environment variables in Expo - Expo Documentation
プロジェクトルートのapp.jsonを app.config.ts に変更し以下の書式に変更
import 'dotenv/config';

export default {
  expo: {...
  ...
}
また、環境変数をapp.config.tsに埋め込む
// app.config.ts

{{ ...
    web: {
      favicon: './assets/favicon.png',
    },
    // 以下を記入
    extra: {
      apiKey: process.env.API_KEY,
      authDomain: process.env.AUTH_DOMAIN,
      projectId: process.env.PROJECT_ID,
      storageBucket: process.env.STORAGE_BUCKET,
      messagingSenderId: process.env.MESSAGING_SENDER_ID,
      appId: process.env.APP_ID,
    },
  },
};
次に、firebaseのコンフィグファイル「 firebaseConfig.ts 」をプロジェクトルートに作成し以下をコピペ
import { initializeApp } from 'firebase/app';
import { getAuth } from 'firebase/auth';
import { getFirestore } from 'firebase/firestore';
import { getStorage } from 'firebase/storage';
import Constants from 'expo-constants';

// 環境変数から読み込んだパラメータを使ってfirebaseConfigを作成
const firebaseConfig = {
  apiKey: Constants?.manifest?.extra?.apiKey,
  authDomain: Constants?.manifest?.extra?.authDomain,
  projectId: Constants?.manifest?.extra?.projectId,
  storageBucket: Constants?.manifest?.extra?.storageBucket,
  messagingSenderId: Constants?.manifest?.extra?.messagingSenderId,
  appId: Constants?.manifest?.extra?.appId,
};

// firebaseAppを定義
let firebaseApp: any;

// firebaseAppを定義
// firebaseAppが存在しないときだけfirebaseAppを作るようにする(複数作ってしまわないため)
if (!firebaseApp) {
  firebaseApp = initializeApp(firebaseConfig);
}

// 他のReactコンポーネントから使えるようにする
export const storage = getStorage(firebaseApp);
export const auth = getAuth(firebaseApp);
export const db = getFirestore(firebaseApp);
React Native Debugger を導入する
他のテストツールとして、最近はFlipperというのが人気だが、2022年始時点で、Expoのmanagedワークフローに対応していない?ため、導入は見送り
インストール方法
公式通りやれば問題ない。(brew --version で Homebrewのバージョンわかる)
インストールが完了し、アプリケーションにReactNativeDebuggerがあればOK
Getting started
(初期起動の場合)まずは、port=8081で起動する
$ open "rndebugger://set-debugger-loc?host=localhost&port=8081"アプリが起動したら、「ツールバー > Debugger > Open Config File」で、
-  defaultRNPackagerPorts: [8080] // 削除
+ defaultRNPackagerPorts: [19000] // ドキュメントだと、19001だが19000で問題なさそうなのでこうした。
保存したら、一旦アプリを閉じる
Expoで起動する
プロジェクトのルートディレクトリで以下を実行
REACT_DEBUGGER="unset ELECTRON_RUN_AS_NODE && open -g 'rndebugger://set-debugger-loc?port=19000' ||" yarn start※ドキュメントだと、19001だが、毎度新規タブを開いて19000ポートを指定してから開きます。みたいになって動作が増えるので、19000で行う。何か問題が起こったら19001に戻す。
※ポート番号は SDK バージョンによって異なるようなので、ご自身の環境に合わせてください。
Expoのデバッグを有効にする
cmd + d または、control + command + z でメニューを開き、「Debug RemoteJS」をタップすることでデバッグモードが有効になる。
デバッグを使わないときは、このモードを解除する(重たくなる要因)
使い方
Debugging your app with React Native Debugger - LogRocket Blog
React Native Debuggerを使った、React Native+Expo開発の流れ - カミナシ開発者ブログ (hatenablog.jp)
インスペクターの起動
→メニューから、Show Element Inspector をタップすると、クリックしたところのコンポーネントを直接デバッグで確認できる。
シミュレータに、「Inspect / Perf / Network / Touchable」とでるのでそれを押すと、開始・終了できる。
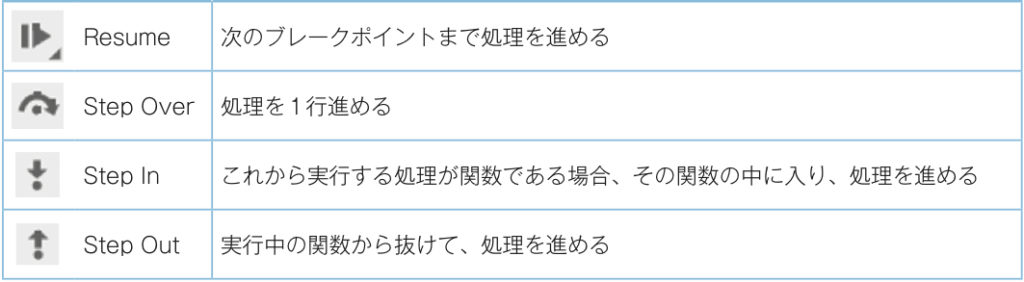
ブレークポイントの設置
TODO: VSCodeでのやり方がないか調べる。
- Developer Tools エリア(コンソールとかソースがあるエリア)のどこかをタップしてから、
command + Pでブレークポイントを置きたいファイルを開く。 - 行番号の左側をクリックでブレークポイントがおける。
Network インスペクター
APIを呼び出したり、正しいAPIパラメータを送信しているかどうかを確認したかったり、サーバーからのレスポンスを確認したい場合に使う。
React Native Debugger 上で右クリックし、表示されたメニューからEnable Network Inspectを選択
Networkタブを開くと、通信のたびになにかしら表示される?
Async Storage 管理
ローカルに保存している値を管理することができる。
下手に Clear とかすると、匿名認証とかもリセットされてしまう?ため注意
注意点
- iOSシミュレータ上でリロードを実行するとなぜか固まる。
- RND上で command + R を押すと、うまくリフレッシュされる。
エラーの対処
以下のようなエラーが出たら、こう対処してみる。
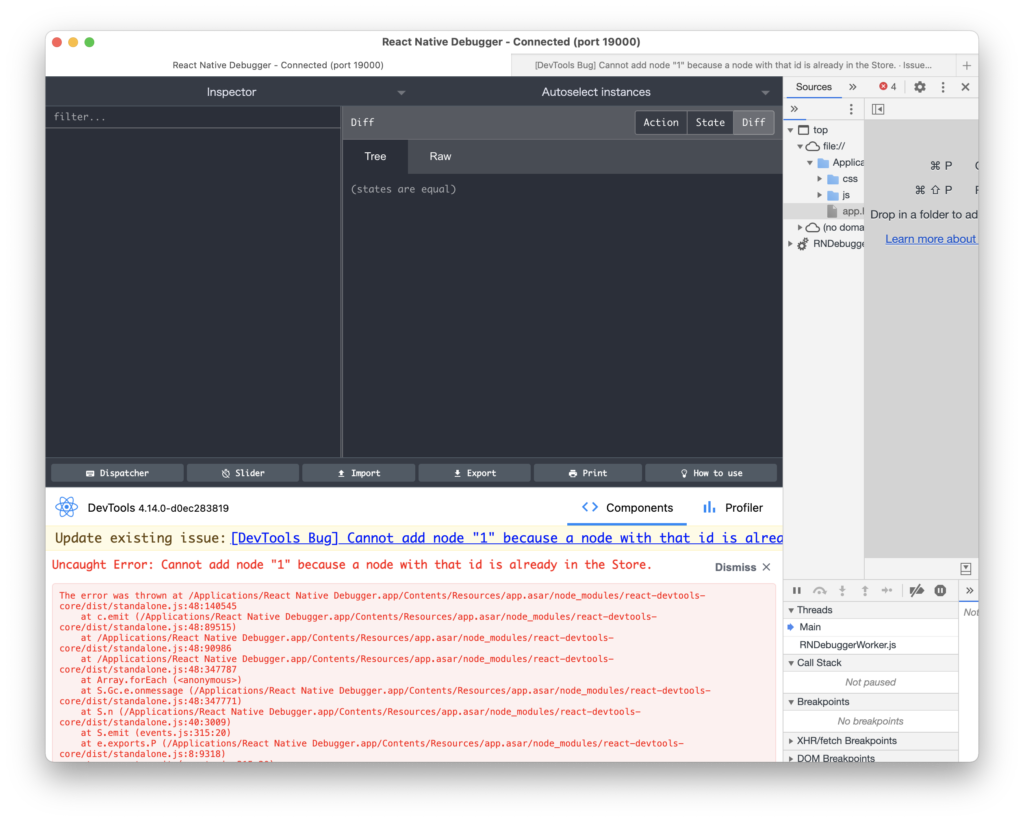

You are running react-devtools version 4.14.0-d0ec283819.
下のエラーだと、npm i -g react-devtools@^4... を実行して、react-devtoolsをダウングレードしろと書いてあるが、この通り実行してもうまくいかない。
対処法
プロジェクトのpackage.jsonに以下を記述
  "resolutions": {
    "react-devtools-core": "x" // xには、"You are running react-devtools version [バージョン番号]"のバージョン番号を入力(上の画像だと、4.14.0)
  }
次に、`yarn`を実行。
これでもう一度、Expoで起動を行えばうまく起動するはず。
