早見表
// Multipass のシェルに入る
$ multipass shell UBUNTU

// rootユーザーになる
ubuntu@UBUNTU:~$ su
Password:〈パスワード入力〉// ●5...
root@UBUNTU:/home/ubuntu#環境構築
p17にMacに検証環境を構築したいときは というコラムがある。
m1macではhomebrewインストール後以下を実行
$ echo 'eval $(/opt/homebrew/bin/brew shellenv)' >> /Users/<ユーザ名>/.zprofile
$ eval $(/opt/homebrew/bin/brew shellenv)
macでは、wsl2の代わりにMultipassをインストールする
$ brew install --cask multipassダウンロードページからtinet_mac.zipをダウンロードしホーム直下に配置
Ubuntuを作成
$ multipass launch 20.04 --cpus 2 --name UBUNTU --mount /Users/a.harada/tinet:/mnt/c/tinetMultipass のシェルに入る
$ multipass shell UBUNTUパスワードを設定しrootユーザーになる
ubuntu@UBUNTU:~$ sudo passwd root
New password:〈パスワード入力〉
Retype new password:〈パスワード再入力〉
passwd: password updated successfully
ubuntu@UBUNTU:~$ su
Password:〈パスワード入力〉
root@UBUNTU:/home/ubuntu#
仮想マシンでセットアップスクリプト(setup_mac.sh)で設定し、チェックスクリプト(check_mac.sh)で確認
$ bash /mnt/c/tinet/setup_mac.sh
$ bash /mnt/c/tinet/check_mac.sh
...省略
========================================================
All checks passed successfully.
========================================================
検証環境構築
$ tinet up -c /mnt/c/tinet/spec_01.yaml | sh -x
$ tinet conf -c /mnt/c/tinet/spec_01.yaml | sh -x
動作確認
cl1にログイン
$ docker exec -it cl1 /bin/bash
// 以下になっていればOK
root@cl1:/#
root@cl1:/# curl -k https://www.example.com/
// 以下になっていればOK
sv1.example.comログアウトする場合
root@cl1:/# exit
// 以下になっていればOK
root@UBUNTU:/home/ubuntu#
2 レイヤー2
root@UBUNTU:/home/ubuntu# tinet up -c /mnt/c/tinet/spec_02.yaml | sh -x

root@UBUNTU:/home/ubuntu# tinet conf -c /mnt/c/tinet/spec_02.yaml | sh -x
wireshark

Wireshark · Go Deep
Wireshark:Theworld'smostpopularnetworkprotocolanalyzer
www.wireshark.org
- macOS Arm 64-bit.dmg ・・・ Apple Silicon 対応版
- macOS Intel 64-bit.dmg ・・・ Intel プロセッサ対応版
p13 WSLインスタンスにログインしたターミナルを2つ開いて...
- ターミナルからタブを新規作成
$ multipass shell UBUNTU
$ su
$ docker exec -it cl2 /bin/bash
片方はcl1にログイン
MACアドレスの確認 ifconfig
$ ifconfig net0

// cl1
net0: flags=4163<UP,BROADCAST,RUNNING,MULTICAST>  mtu 1500
        inet 192.168.11.1  netmask 255.255.255.0  broadcast 192.168.11.255
        inet6 fe80::24df:bdff:fe08:efd8  prefixlen 64  scopeid 0x20<link>
        ether 02:42:ac:01:10:01  txqueuelen 1000  (Ethernet)
        RX packets 252  bytes 42390 (42.3 KB)
        RX errors 0  dropped 0  overruns 0  frame 0
        TX packets 203  bytes 30950 (30.9 KB)
        TX errors 0  dropped 0 overruns 0  carrier 0  collisions 0

// cl2
net0: flags=4163<UP,BROADCAST,RUNNING,MULTICAST>  mtu 1500
        inet 192.168.11.2  netmask 255.255.255.0  broadcast 192.168.11.255
        inet6 fe80::3c9e:6bff:fe8d:3a65  prefixlen 64  scopeid 0x20<link>
        ether 02:42:ac:01:10:02  txqueuelen 1000  (Ethernet)
        RX packets 237  bytes 39116 (39.1 KB)
        RX errors 0  dropped 0  overruns 0  frame 0
        TX packets 180  bytes 28316 (28.3 KB)
        TX errors 0  dropped 0 overruns 0  carrier 0  collisions 0
02:42:ac:01:10:01 がMACアドレス
パケットキャプチャ tcpdump
cl2でcl1のパケットをキャプチャ
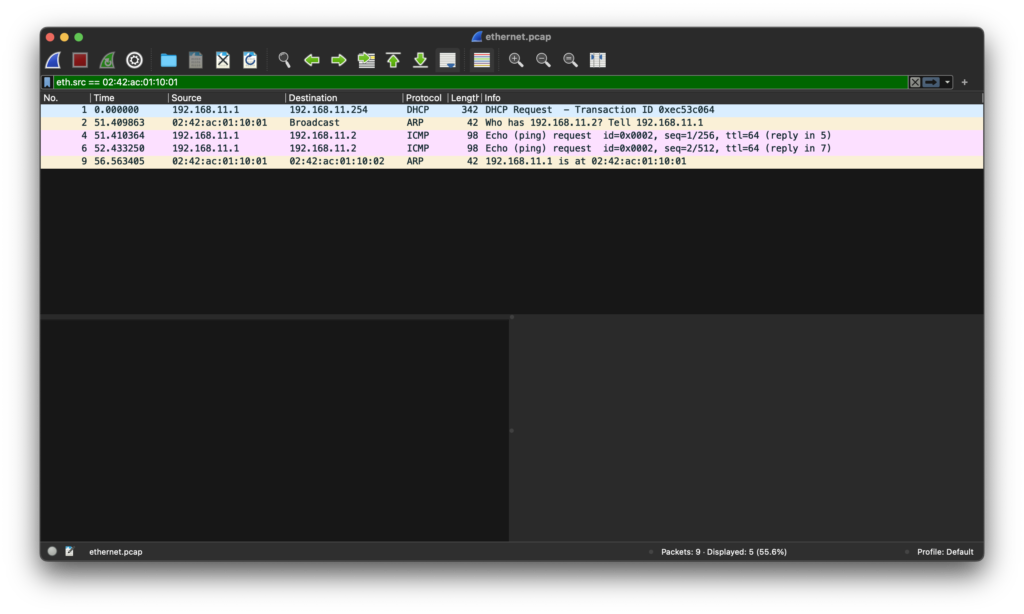
root@cl2:/# tcpdump -i net0 -w /tmp/tinet/ethernet.pcap ether host 02:42:ac:01:10:01
// 以下が出ればOK
tcpdump: listening on net0, link-type EN10MB (Ethernet), capture size 262144 bytes
※ 拡張子を pcap にしても同様のエラーが出た場合は、 「multipass stop UBUNTU」 → 「multipass start UBUNTU」で、仮想マシンを一度再起動してみてください。
https://sbcr-dl-and-idea.s3.ap-northeast-1.amazonaws.com/2024-01-11-18599-体験しながら学ぶネットワーク技術入門/tinet_mac_m.pdf
cl1 からイーサネットフレームを送信 ping
root@cl1:/# ping 192.168.11.2 -c 2cl2 で ctrl+c を押し,tcpdumpを終了
/Users/a.harada/tinet 配下に ethernet.pcap が作成されるのでそれを開く
フィルターで、eth.src == 02:42:ac:01:10:01 と入力